Suturing & Pseudo-Suturing
Equipment
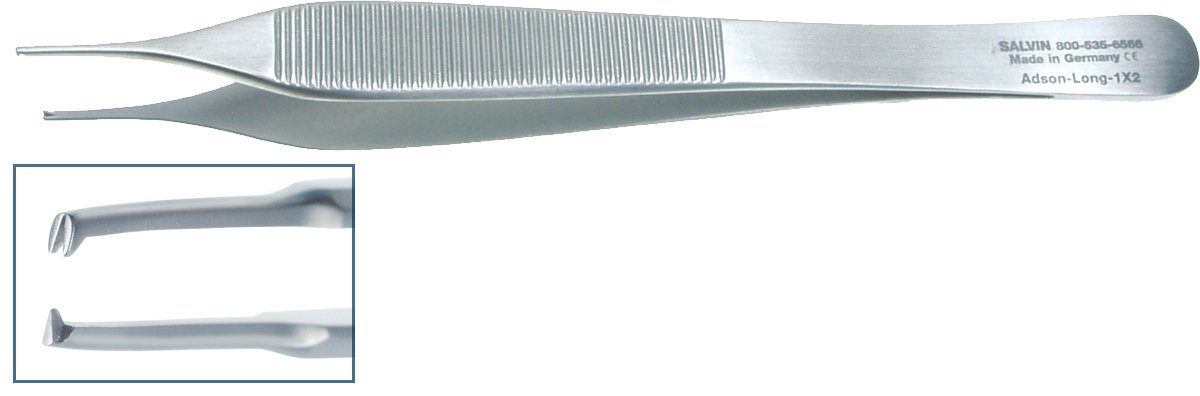
Forceps
Sometimes called “Pick-ups”
Can be toothed or non-toothed
Used primarily to grab tissue during suturing and to manipulate objects during the procedure
There are many types of forceps, the ones preferred for suturing are called Adson Forceps which are toothed at the tip for grabbing tissue
On the Adson Forceps (pictured right), the number of teeth and configuration of the teeth can vary
Adson-Brown Forceps have multiple teeth and are usually used for more delicate tissue
Needle Holder
Sometimes called a “Needle Driver”
Used to push or manipulate the suture needle during a suturing procedure
There are different configurations of needle holder, but the most common is the “Finger Grip” style with the ratchet locking mechanism (pictured right), very similar to hemostats.
The jaws of needle holders are often reinforced with Tungsten Carbide for enhanced grip and increased durability
Scissors
Come in lots of different shapes, sizes, and configurations depending on the procedure
Used primarily for cutting sutures
Many Needle Holders now have scissor blades built into them eliminating the need for a separate instrument
Sutures
When we talk about a suture, we are talking about the needle and the thread
Typically come sterilized with the thread already attached to the needle in the same package
There are a wide variety of different types of sutures varying by needle size, needle shape, thread materials, and thread length.


Thread Materials
Each type of suture thread has distinct uses, advantages, and disadvantages in a medical setting. For most of what we do in the lifestyle thread selection will probably come down to availability and personal preference. However, there may be specific scenes or modalities of S&M that may require specific characteristics of sutures be chosen.
We categorize Suture Threads primarily along two classifications; Permanence and Configuration.
Permanence (Absorbable & Non-Absorbable):
Absorbable suture thread is designed to be dissolved by or absorbed into the body usually in a matter of weeks.
Non-Absorbable suture thread is designed for closure with longer heal times where they may never dissolve or take years (not weeks) to dissolve.
Configuration (Monofilament & Multifilament/Braided):
Monofilament suture thread contain a single strand, this means they experience lower resistance through tissue but they typically contain more memory which means more throws are required to tie a secure knot with them.
Multifilament (sometimes called Braided) contains two or more stranded twisted together. The twisting provides better tensile strength, better knot security, and easier thread handling, but it adds risk of infection (because the space between the strands can harbor infectious pathogens).
Further characteristics to consider include:
Tensile Strength: This is the threads breaking strength. If tensile strength is too low, the thread is break will approximating the closure, if the tensile strength is too high the suture will cut through the tissue creating the “cheese-wire” effect.
Tissue Resistance: Amount of resistance the thread experiences passing through tissue. The more resistance, the more local tissue damage can occur. Monofilament sutures usually have lower tissue resistance.
Memory: The ability to return to it’s original shape after bending or deformation. The more memory a suture has, the less pliable it is, and the less pliable it is, the more throws that will be required to tie a secure knot with it, leading to lower knot security overall.
Elasticity: The ability to return to it’s original length after stretching or deformation. Tissue that is approximated can swell, as such sutures should exhibit some elasticity.
Thread Size
Modern suture sizes are standardized by the United States Pharmacopeia (U.S.P.) and range in size (from largest to smallest) #5 to #0 then #0-0 to #11-0.
It should be noted that the sizing is not based on the diameter of the thread but on the breaking strength of the suture material, so for example a 3-0 steel suture and a 3-0 nylon suture will have much different diameters, even though their USP designations are the same.
Thread Length, Needle Configurations, Needle Shapes, and Needle Types
Standard packaged thread lengths: between 15 and 45 inches.
Common needle configurations: “Double armed” with two needles (one on each end of the thread) and “single armed” with a single needle.
Needle Shapes: This refers to the overall shape of the shape of the needle. Common shapes are; Straight, Half Curved, 1/4 Circle, 3/8 Circle, 1/2 Circle, 5/8 Circle, and Compound Circle (see the chart to the right for visual reference).
Needle Types: This refers to the configuration of the needle itself and the cutting surfaces of the needle, the most common being Conventional Cutting and Reverse Cutting (see the chart below for visual reference).

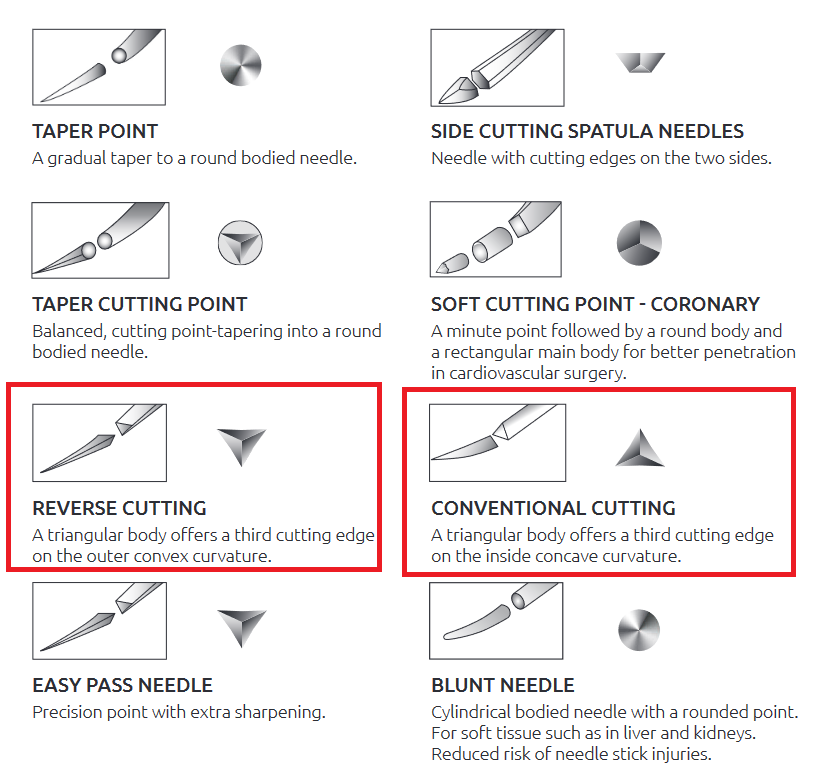
The primary difference between Reverse Cutting and Conventional Cutting is where the third cutting edge is.
The point on each is triangular, providing three cutting edges, but with Conventional Cutting the third cutting edge is oriented on the inside of the curve of the needle (or “pointing up”), where Reverse Cutting places that edge on the outer edge of the curve (or “pointing down”).
Reverse Cutting is typically preferred for skin because it is less likely to damage the skin while cutting through it.
Suture Needle Shapes
Chart with U.S.P. suture sizing mapped to other measurements including AWG (e.g. needle gauges)
Chart showing the different suture threads by their material categories
Suturing Technique
Suturing takes manual dexterity, hand-eye coordination, and lots of practice. Luckily for our purposes we don’t really need to know all of the techniques that medical professionals are expected to be familiar with.
There are however some basics that you will need to understand and practice for what it is that we do.
Basic Tool Manipulation
Hold the needle holder in your dominant hand. There are multiple ways you can grip the instrument, the two most common either use the loops (putting you thumb and ring finger in them) or don’t (known as “palming”).
Practitioners say that palming allows for more maneuverability while using the loops does allow for more stability which allows for leverage to get the needle through thicker tissue.
Hold the forceps in your non-dominant hand like you would hold a pencil to write.
If using the Adson Forceps, the needle should rest in the bottom notch of the tip of the forceps when manipulating it.
The basic idea is that you are going to initiate the “stitch” with the needle holder (your dominant hand), pushing the needle into the tissue with it, once the needle has been pushed through the tissue enough that you can grip the needle on the other side you will use the forceps in your non-dominant hand to pull the needle and thread through the tissue the rest of the way.
You will use the same basic motion whether you are suturing “out to in” where the needle is travel from outside the body to inside of it, “in to out” where the opposite is true, or “out to out” where you are going straight through the skin.
Basic Knots and Patterns
As we mentioned earlier, there are lots of different patterns that medical professionals will use in different scenarios to achieve different results. The ultimate goal in a medical setting of suturing is to facilitate wound closure and healing with as little cosmetic impact as possible. Many of the suturing techniques were developed with the cosmetic aspect of the results in mind. These are interesting to learn, but likely not to be extremely helpful for our purposes, however we do need to familiarize ourselves with the basics.
I have watched literally hundreds of video tutorials on the internet and by far the one that helped me the most is the one linked here: https://www.youtube.com/watch?v=TFwFMav_cpE
It is titled “Learn How To Suture - Best Suture Techniques and Training” by Plastic Surgeon Dr. Michael R. Zenn as part of Duke University Medical School of Surgery, Suture Skills Course.
This video demonstrates and explains the basics of this better than I ever could. The basics you will absolutely need to know are:
Instrument Tie
Simple Interrupted Suture
Simple Running Suture OR Simple Running Locking Suture
Feel free to learn and practice the others as well…
Pseudo-Suturing
Pseudo-suturing is a practice where our aim is achieve the same result as traditional suturing but we are using alternative methods to do so. These methods may use some of the equipment and techniques mentioned above but will not use all of them and will implement other elements from more traditional sharps play.
Pseudo-suturing is typically done using hypodermic needles and sanitized or sterilized monofilament line or thread.
A hypodermic needle is punctured through the skin where you want the “suture” to run. Then the clean monofilament line is fed into the bevel end of the hypodermic needle until it comes out of the hub. While securely holding the line, the hypodermic needle can be removed by pulling it back out, leaving just the monofilament line under the skin where the needle was. You can now execute your instrument tie and trim and excess, or place additional needles and run the line through additional channels.
Valid question! There are several reasons why one might opt for pseudo-suturing over traditional suturing.
Convenience; especially for either quick low risk applications (like attaching objects like bells or weights to people) or when speed is important (like an emergency medical triage situation).
In situations where traditional suturing equipment is not available or accessible.
Pseudo-suturing may also be a viable option for someone with a specific phobia around medical procedures where the medical instruments used in traditional suturing would perhaps be triggering.
Why Bother?
Shopping List
Harbor Freight: Braun 421 Lumen LED Rechargeable 3-in-1 Quick Connect Light Kit
References
The Apprentice Doctor: The Suturing Instruments Used in Wound Management - https://www.theapprenticedoctor.com/suturing-instruments-used-wound-management/
American College of Surgeons, Division of Education, Student Resource Task Force - Commonly Used Surgical Instruments. Michael R. Visenio, MS IV, University of Nebraska Medical Center - https://www.facs.org/media/wgcmalet/common_surgical_instruments_module.pdf
Teach Me Surgery: Suture Materials - https://teachmesurgery.com/skills/surgical-equipment/suture-materials/
Oxford Medical Education: How to suture - https://oxfordmedicaleducation.com/clinical-skills/procedures/how-to-suture/
American Academy of Opthalmology: EyeWiki - Comprehensive Suture Guide. Brandon Baartman, MD - https://eyewiki.aao.org/Comprehensive_Suture_Guide
Geeky Medics. Mr Colin Brewster and Mr Iain Anderson - Simple Interruped Suture - OCSE guide - https://geekymedics.com/simple-interrupted-suture-osce-guide/
Wikipedia: Needle holder - https://en.wikipedia.org/wiki/Needle_holder
Wikipedia: Surgical suture - https://en.wikipedia.org/wiki/Surgical_suture